Posts tagged ‘chicken’
Summer BBQ
Everyone has a slightly different meaning of appropriate cook-out foods depending on your cultural and regional backgrounds. Growing up in NJ, a summer BBQ always meant hamburgers and hot dogs, potato salad, and chips. To my husband, who was born in Brazil, no cook-out is complete without linguica (Brazilian sausage) and short ribs. I have also heard that BBQ and cook-out can signal two totally different affairs if you are from the southern US.
No matter what, it is hard to disagree that anything off the grill just screams summer. My husband got a new Weber charcoal grill for his birthday yesterday, so we are excited to have many grilled treats this summer. Here are some of my favorite summer recipes for the grill. These are all perfect for any special graduation celebrations or Memorial Day BBQs coming up!
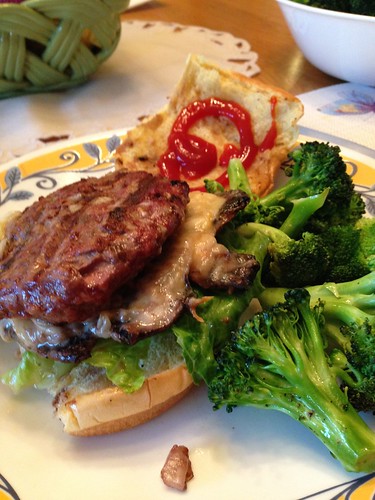
Homemade Shake Shack – Two Ways

Fingerling Potato and Asparagus Salad


Vinegar Braised Chicken and Vintage Cast Iron

My husband and I have a new vacation hobby – browsing antique stores. While we are in no way knowledgeable about what we are looking at, we enjoy looking around at old furniture, imagining what old kitchens looked like, and reading old letters or signs. We like to look for unique old pieces to mix in with our new and more modern furniture to give our home an eclectic and lived in feel. So far, we have only made two purchases from antique stores, mainly due to limited space and a tight budget. Our rule is that the item we select must be usable or repurposed in some way. So far, we have gotten a hand painted planter set for a kitchen herb garden and a cast iron dutch oven – both of which we have already put to use! I was so excited about the dutch oven because it is pre-seasoned from years of use, and came at a far lower price tag than the pretty enameled ones that I have always looked at. I like using dutch ovens over regular pots when meals require long cooking time, since the thick bottom holds the heat evenly and results in less sticking to the bottom. So far, I have used my pot to make Frugal Feeeding’s Greek Lamb with Orzo (I made this for Easter but it would make a lovely Mother’s Day meal!) and Bon Appetit’s Vinegar Braised Chicken.

For my braised chicken, I served it over homemade pasta to recreate a favorite restaurant meal. It was delicious, and would be another great meal to honor the special women in your lives! I used leg quarters and picked the large bones out prior to serving to create an easier to eat pasta dish. The ratios in the dish can be easily reduced if you do not want to make 5 lbs of chicken (I halved it to serve 4 people). The chicken would also taste great over rice, cous cous, or quinoa if pasta is not your mom’s favorite! Either way, I hope you all get to spend a beautiful weekend celebrating mothers, grandmothers, daughters and good friends who have helped to shape and mold you. I am especially thankful for my mom and the time we have gotten to spend together over the past two months!

Question: What are you doing to celebrate Mother’s Day?
Change of Seasons
The weather is finally starting to warm up in the New Jersey, getting me excited for grilling season! While many people think of seasons in terms of weather, I often think in term of food seasons. The fall and winter are roasting seasons, perfect for root vegetables and hearty meals; the spring and summer are grilling ones, great for fish and grilled peppers, zucchini, and eggplant. Don’t get me wrong – there is nothing I like better than both cooking and eating outdoors when the weather allows. However, I will miss my oven, which usually goes neglected from May through September to keep the house cool. If you are looking for a final oven meal to warm up with during cooler early spring nights, this one is a great staple!

I found a basic roasted chicken recipe in one of my mom’s many food magazines. (Being on this extended vacation is seriously great for my cooking creativity!) I tweaked it slightly to use up what I had on hand, but have so many ideas for variations! I used red onion and thyme as called for in the original recipe, but decided to use chicken thighs and baby bella mushrooms for a bit more flavor and earthiness. I think that shallots or Vidalia onions would actually be even better than the red onions, and that a little more garlic would be welcome. I would also love to play with the herbs, switching out the thyme for rosemary or basil. If you aren’t a mushroom person, you could easily leave them out, or add some cherry tomatoes in their stead. Since I am currently cooking for 4-6 people on a regular basis, I couldn’t quite make it a one-skillet meal, but think this would be an easy task if cooking for one or two! Just throw some cubed potatoes (parboiled to make them cook at the same time), vegetables (I love asparagus and Brussels sprouts in the oven), and the chicken thighs into an oven safe skillet and bake!
Question: What is your favorite “food season?”

Roasted Chicken Thighs with Mushrooms and Red Onions
serves 4
2 tbsp olive oil
1 – 1.5 lbs boneless, skinless chicken thighs (organic if possible)
1 red onion, sectioned
8 oz baby bella mushrooms, halved
salt, pepper and thyme to taste
Preheat the oven to 450 F. Heat olive oil over high heat. Quickly sear the outside of each chicken thigh over high heat. Add red onion sections and mushroom halves, then season to taste with salt, pepper, and thyme. Place skillet in oven and bake for 30-35 minutes, or until chicken thighs are cooked through. Remove and allow to cool prior to serving.

Cooking for my Husband
Since we have some time off before moving for my residency, Dan and I have been enjoying knocking some things off our cooking bucket list. One of the first things that came to Dan’s mind was chicken pot pie. His list of comfort foods is rather polarized, reflective of his multicultural upbringing: Korean stew (soon doo boo jjigae), Brazilian feijoada, and American Mac n’ Cheese or Chicken Pot Pie. Since pot pie is a little labor intensive, we knew we wanted to tackle it while we had some time to spare!

We found this recipe on Allrecipes.com and decided to give it a try. Our results were both tasty and messy, but we were impressed by our first attempt. The only change we made was using coconut oil to cook the onions instead of butter to lighten the dairy load. We think that cooking a little more of the filling liquid off and adding a pinch more salt and pepper next time would make this recipe perfect. We also decided to make our own crust, using a double batch of this basic all-butter pie crust recipe. We replaced about half of the flour with whole-wheat, and also added a pinch of garlic powder, basil and black pepper to enhance the savory dish. The crust was perfect, with none of the artificial flavor that bugs me about store-bought pie dough. Most importantly, the Husband approved and had his comfort-food craving satisfied.

Will I be making chicken pot pie often? Unlikely! It is quite labor intensive, and still requires a good chunk of butter no matter how you slice it. It would, however, be an easy freezer meal to make this summer and have for a long, cold winter night ahead. Either way, this is a fun and comforting meal if you are looking to spend a little time in the kitchen this week!
Question: What is your comfort food?
Simple, Healthy, Delicious
If you haven’t noticed, I am rather passionate about those three words in the title. Food should be simple, healthy, and delicious. Simply put. I often feel like a broken record, but there are times where even I forget that. When life gets busy, take-out seems easier. Healthy seems to fall by the wayside. Delicious seems like a luxury.
I have been doing lots of reading and research for school about talking with and educating patients about nutrition and developing healthy lifestyle habits. It is remarkable how ineffective we as a medical community have been at focusing on prevention of chronic disease! As I read more about the “standard American diet,” often pithily labeled the “SAD” diet, I think that the lack of nutrition in the average diet can’t all be related to lack of access or knowledge. I often think that healthy eating, generally, feels the opposite of the things above. Prepping fruits and vegetables does not feel simple. It is time-consuming and takes planning and thought. Kale also isn’t always the most appetizing, even for the biggest veggie enthusiast. So… how do we find a way to unify these words again?

Take some short cuts every once in a while! I recently discovered the pre-cut items at Trader Joe’s and have instantly fallen in love. (I know, I catch on slowly.) Broccoli slaw, spinach, kale… you name it! Cut, washed and ready to go, there isn’t an easier way to get greens on your dinner plate! While the bag of kale will be marked up compared to a bunch of it, the time savings is often worth it. So that takes care of the simple, now what about the healthy? Trader Joe’s (and Costco!) also have a great line of flavorful chicken sausages that add tons of interest to any simple meal! I really like the Chipotle Mango Chicken sausage, but my favorite is the Spinach and Red Pepper Chicken sausage (from Costco). There is so much flavor packed into each bite of these sausages that a lot of the work in finishing off your delicious meal is done for you! Try out the recipe below- packed with protein, fiber, and flavor, there is no better quick fix to get greens on your weeknight dinner table!
Are you as convinced as I am that food should meet all of those three criteria? Then share with me your tips and tricks for making healthy eating simple and delicious!


Chicken Sausage, Kale and Quinoa Salad
serves 4-6
1/2 white onion, diced
2 cloves garlic, minced
1 tbsp olive oil
1/4 cup sun-dried tomatoes, diced
1 cup quinoa
1 cup low sodium vegetable broth (or chicken)
1 cup water
1 tbsp white wine vinegar
5 Roasted Red Pepper and Spinach Chicken sausage links
Parmesan cheese, to serve
In a medium saucepan, saute garlic and onion in the olive oil for 3-4 minutes or until soft. Add the sun-dried tomatoes and stir for 1 minute. Add the quinoa, then stir for about 3 minutes or until the quinoa is well toasted. Add the water, broth, and vinegar. Bring to a boil, then reduce heat to simmer until the quinoa is cooked and most of the liquid has been absorbed. Meanwhile, steam the kale until just before it is soft. (I microwaved it with a bit of water for 3 minutes). Also cook the chicken sausage links in a frying or grill pan until crispy on the outside and heated through. Slice the chicken sausage links into bite-sized rounds. Stir together the quinoa, cooked kale and chicken sausage until well-combined. Serve with a sprinkle of parmesan cheese. Enjoy!
A Veggie Filled Evening in Orebic
Only appropriate to share about the end of my time in Orebic during my last post about my summer travels! Hope you have enjoyed hearing about some of my summer wanderings, and check out the Adventures page if there are any posts you missed!
On our last evening in Orebic, we still had quite a bit of food in the fridge to clear out. We had an eggplant, some fennel, a bag of peppers from Bosnia, half of an onion, some gnocchi, and the other half of our pounded chicken breasts. I daydreamed of how to combine all of these different flavors as I soaked up my last views of the town and the sea, and came up with a plan. I’d make skewers! Too bad the skewers I thought I had seen in the utensil drawer earlier that day turned out to be strange knives. Not a set back, just a chance to think creatively about dinner again! I decided to pair the eggplant and fennel to make stacked rounds of veggies, use the peppers and onions together, and serve that alongside the chicken and the gnocchi, lightly tossed in olive oil salt and pepper.

I spent most of my energy on the eggplant. I sliced it into rounds, and then sliced the fennel into rounds. I carefully arranged the stacks, and then drizzled them with olive oil. I drizzled the pan with olive oil as well, and then arranged the eggplant on the pan. Instead of cooking them separately and then stacking them, I was for some reason determined to keep them together the whole time. To cook the eggplant through faster, I haphazardly covered the pan with another frying pan to trap the heat. Satisfied with this, I moved on to prepping the chicken and peppers. The peppers aren’t your typical densely hued bell peppers. They are pale and a little milder in flavor, and really great to soak up the flavor of what you cook it with.

At first I planned to keep these separate, but realized I had run out of pots and pans. Instead, I began to sautee the peppers and onions with some apple cider vinegar. I borrowed my method from cooking the apricot chicken and moved some of the veggies to the side. The chicken simmered in the vinegar and was covered by peppers to maintain the heat. A little ingenuity made up for a lack of kitchen tools!

Dinner was satisfying – the chicken was moist while the peppers retained some crunchiness, contrasting nicely. The eggplant was also really tender, even if it didn’t pick up as much fennel flavor as I had hoped. It still looked really cool, so I want to continue to experiment with how to make it better! We all had a craving for ice cream (sledolad), and so walked to town after dinner to visit Azra’s favorite ice cream shop. The employees handle hordes of customers at a time, but always had a smile and often put on a show. I tried rosehip and hazelnut ice cream, which was heaven on a cone. The rosehip had a really intense fruit flavor that seemed most similar to a tart dried cherry, but was much sweeter and more intense. It was countered really nicely by the hazelnut, and I found myself wanting another cone after finishing my first! A great last evening at a great friend’s vacation home.

Question: What is your favorite flavor of ice cream?
Apricot Chicken in Croatia
The story of this dinner begins with our infamous train ride from Sarajevo to Ploce. I really wish that I took a picture of our train car, but you will just have to imagine. My friends can attest that my description is not an overexaggeration. The car we sat in looked like it was straight out of 1970. The seats were uppholstered in blue velvet, and were definitely not spaced well. There were two awkward groupings of four, another pair, and a single seat. The were spaced too far apart to maximize the number of people on the train, but too close to want to sit with strangers. We couldn’t find seats together, and so sat two and one, all awkwardly facing Bosnian men. To top things off, my chair was broken and the arm of the seat fell off every time I moved, and our windows were broken. At first this just meant it was hot, but later it meant that we were trapped in lung clogging smoke as a lady in the car in front of us chain smoked for the entire 5 hour trip. The journey was slower than scheduled, it was hot, it was hard to breathe, and we were all a little flustered by the end. The scenery out the window was beautiful, but was not quite enough to make up for the dilapidated and smoke-filled train car.

Because food is so cheap at Bosnian markets, Azra thought ahead and stuffed her backpack with market purchases from the previous evening. We brought along figs, plums, apricots, peppers, peaches, onion, and some other veggies for dinners. We were worried about being searched at the border, but the Croatian patrols hardly looked past the American symbols on our passports before walking past us on the train. The Bosnian family behind us was not so lucky, and Azra reported with a smirk that they were trying to claim their bundles of produce as snacks for the train as their bags were searched at the border.

While we were cleared at the border, not all of the fruit survived the journey. After being lugged from cab to train to ferry to bus, most of the apricots were DOA. Not being a waster of food, I brainstormed how to use them. Dinner? Dessert? Breakfast? After a trip to the market and purchase of some chicken breasts from the butcher, I knew some Apricot Chicken was in store. First, I pounded out the thick chicken breasts with a frying pan. My friends were alarmed by the noise since I began without warning, but learned the method to my madness. Not only did we get two meals out of our three chicken breasts, but the chicken was also much more tender and took up flavor better once thinned out a bit. To start the sauce for the chicken, I sautéed up half of a white onion in some olive oil. I added around 10 small apricots that we pitted and halved. I let these begin to cook down a bit and then added a splash of red wine for some extra liquid. I moved the fruit to the side and added the chicken breasts to the pan, seasoned lightly with salt and pepper. I covered them back with some liquid from the sauce and let them simmer for a bit on each side. The chicken soaked up the flavor from the sauce, and came out perfectly sweet and tangy.


Dinner was served with some gnocchi, which were perfect to soak up the extra apricot sauce. We also cooked up some purple string beans, which I had to have from the market solely because they were purple. They lost some of their color when steamed, but they tasted exactly like green beans! I loved having veggies back on my dinner plate, and was really pleased with my impromptu dinner. I wish I had written down the recipe, but I am too far removed from when I made this dinner to be able to write down exactly what I did. Hopefully the description above is enough of a springboard if you want to attempt to create your own version of apricot chicken! Experiment a little to see what happens… the wine was a last-minute addition that made a huge difference.

Beer Can Chicken
There is a reason I love to cook: my mom. I grew up watching her and my grandma in the kitchen, creating healthy, wonderful dinners and loving every minute of it. My mom made a fabulous Father’s Day dinner since I was in charge of breakfast, so I’ll let her tell you all about it!

I love to cook outside. Since I grew up camping, a tradition I continued with my own family, we always say everything tastes better when you eat outside. I believe that goes for cooking as well! As soon as I can clear the snow from my grill, I start grilling everything. That’s where Jen got her love for grilling everything, including pizza.

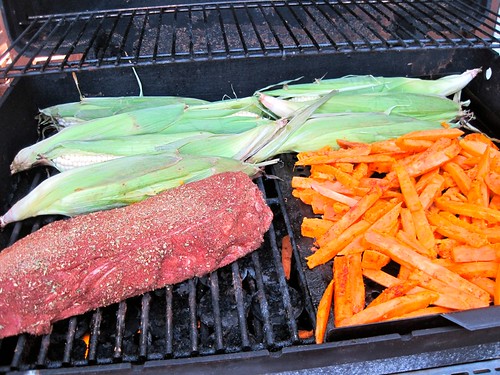
A few years ago at a camping show, I ran across this simple little stand to roast chicken on the grill with a can of beer inside the cavity of the chicken. What a fabulous idea! I hadn’t used it for a summer or two so I decided Father’s Day would be a perfect time to try it out again. It was a beautiful sunny day and we were going to be hanging around our pool. Since it takes a bit of time–about 2 hours– you do need to choose a day when you can keep an eye on the grill. And so easy too! I just rubbed an oven stuffer chicken with some Montreal Chicken seasoning, drank the top quarter of the beer ;), placed the can into position in the stand, and plopped the chicken on top! After a couple of hours, we had the juiciest, most flavorful chicken ever. Even my veggie-loving daughter couldn’t help but go back for seconds on this chicken! Jen had a great idea to use the remaining beer to make a delicious mustard ale sauce to accompany our chicken. Of course we rounded out the meal with a big basket of colorful grilled vegetables and fingerling potatoes. Yum!

Question: What is your favorite outdoor meal?
Beer Can Chicken
1 roasting chicken
1 can beer
2 tbsp Montreal Chicken Seasoning
Special equipment: beer can stand
Rub an oven stuffer roaster chicken with the Montreal Chicken seasoning, or rub of your choice. Open a can of your favorite beer and drink the top quarter. :) Place the beer can in the center of the beer can stand. Pull the chicken over the beer can on the stand. I put my beer can stand on a grill basket used for grilling vegetables for extra support. Place on grill over very low heat and grill for about 2 hours or until the chicken is done and the temperature popper pops. If your grill has a top rack you may need to remove it so that you can close the grill cover completely over the inverted chicken. Now just sit back and relax with another beer while your chicken roasts on the grill. You may need to keep on eye out for flare-ups to avoid charring the chicken. When the chicken is fully cooked, allow to rest for 10-15 minutes before removing skin (and char) and carving.

Mustard Ale Dipping Sauce
1/2 cup Dijon mustard
1/2 cup beer (leftover from steaming chicken)
1 tsp salt
1 tbsp brown sugar
1/2 tsp fresh ground black pepper
Mix all ingredients together in a small sauce pot over medium heat. Slowly bring to a boil so the mustard begins to thicken again. Once it comes to a rolling boil, remove from heat. Serve luke warm or cold depending on preference.
A Return to Normalcy
Life as I knew it? Well, for the most part! My family left this morning for their two-day drive back to Florida, which means I have a room and a bed again! I am sad to see my family leave – it is a rare occasion that we are all together, and we truly do have a lot of fun together! We made a lot, lot, lot, lot of delicious meals together this week, drank a lot of coffee, and had a lot of laughs as well as serious conversations. I am so grateful to have such incredible people in my life! However, I am looking forward to a little more quiet time and to cooking for 4 again. (Cooking for 9 for a week requires a lot of planning!)

With that being said, this dinner post still isn’t quite my normal. Like I said in my About Me, I have recently begun eating meat again in preparation for my trip through Europe (coming up so soon – I leave in 3 weeks!) I have so far made dinners that are primarily seafood, and still find myself making vegetarian sandwiches and avoiding burgers at all costs. Last night’s dinner, totally out of my vegetarian comfort zone, was way better than I even expected! Chicken breast stuffed with goat cheese, artichoke hearts, and sun-dried tomatoes – simple, healthy, and easier than the resulting dish looks, especially with this How-To. To make sure we got our veggie quota, I served it with a simple salad and sautéed green beans. This is my favorite way to do green beans, so I am posting that recipe as well! A two-for-one Friday special since I got out of work early!

Stuffed Chicken Breasts
5 small chicken breasts, pounded thin
5 oz goat cheese
5 artichoke hearts, drained
7 sun-dried tomatoes
1 tbsp fresh basil, chopped
pepper to taste
Lightly beat chicken breasts so that they are thin enough to roll. In a small bowl, mix together goat cheese, artichokes, tomatoes and basil. If necessary, microwave the cheese mixture for 30 secs – 1 min so that it is soft enough to stir. Divide mixture evenly between the chicken breasts, roll, and secure with toothpicks. Bake uncovered for 20-22 minutes at 350 degrees. Turn the oven to broil at 450 degrees, and broil for about 10 minutes until the chicken is fully cooked.

Sautéed Green Beans
serves 4-5 people
1 tbsp olive oil
1 shallot, diced
1 tbsp garlic, minced
4 cups green beans
2 tbsp red wine vinegar
In a large pan, sautée shallots and garlic in olive oil over medium heat. Add the green beans, turn heat to low, and cover the sautée pan to allow green beans to cook slightly, about 10 minutes. The green beans should still be crisp and bright green, but no longer raw and bitter. At this point, turn the heat to high and add the red wine vinegar. Allow most of the liquid to boil off, which will happen quickly in just a few minutes. Season lightly with pepper and serve.

